

Designing a die-cut sticker involves creating a custom shape and designing within its contours. Choose a unique design, then refine the edges for the die-cut process.
Creating eye-catching and memorable die-cut stickers can be an effective way to promote a brand, event, or personal project. Die-cut stickers stand out due to their custom shapes that fit around the design, giving them a distinctive and professional appearance.
Before starting, one should have a clear idea of the artwork, message, or logo to be featured. Tools like vector graphic software streamline the process, enabling precision in shaping and designing your sticker. Selecting bold colors and strong visual elements will ensure your sticker makes an impact. Remember, the quality of the sticker’s material and adhesive also plays a critical role in the overall finish, so select them wisely to ensure your sticker looks great and lasts long.
Introduction To Die Cut Stickers
Ever wondered why some stickers stand out more than the rest? Enter the world of die cut stickers, the personal touch in the realm of custom sticky art. Unlike regular stickers, die cut stickers follow the unique shape of a design, making them pop on any surface.
Popularity Of Custom Stickers
Custom stickers have become a trend, splashing personality on laptops, water bottles, and more. They serve as brand ambassadors, artistic statements, or just fun decor. Businesses and creators alike use custom stickers to grab attention and make connections.
What Sets Die Cut Stickers Apart
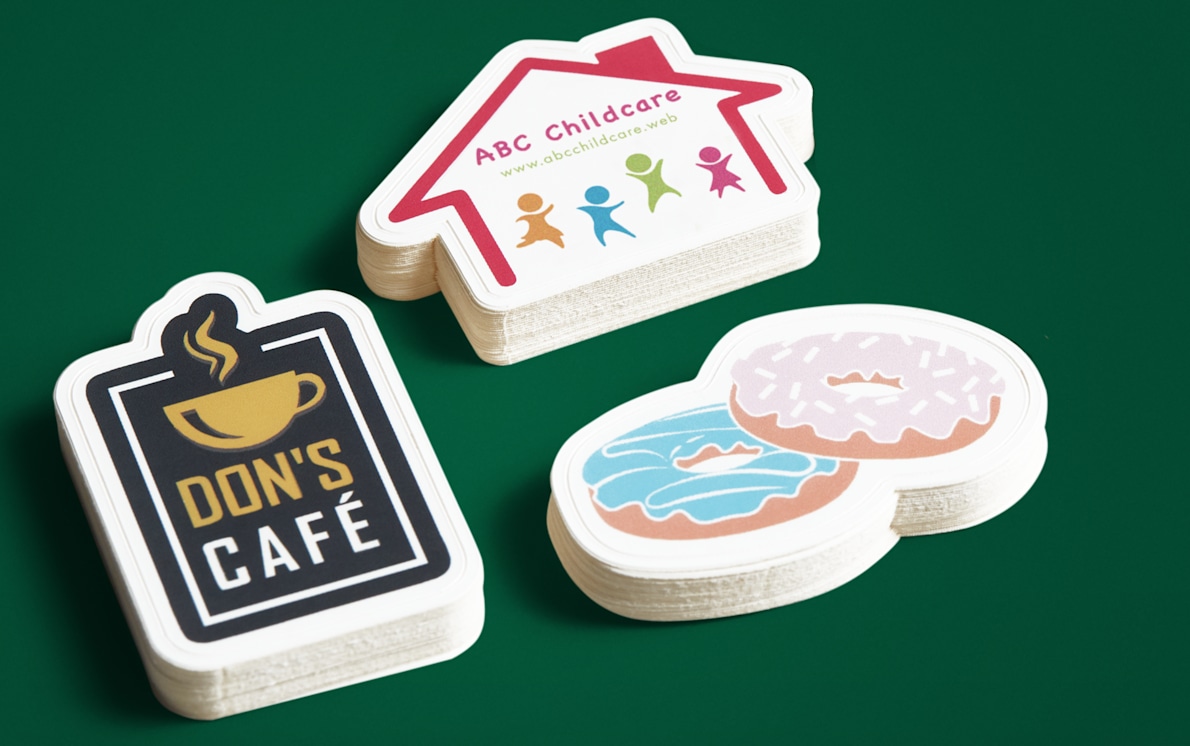
Die cut stickers are special. They match the shape of a logo or design, leaving no excess backing. This tailoring ensures that the focus is on the artwork. The precise cut conveys a high level of detail and professionalism.
Credit: www.vistaprint.com
Materials And Tools Required
Designing a die-cut sticker requires specific materials and tools to transform your creative vision into a sticky reality. Prepare to embark on a journey through the essentials, from the perfect paper to precision-cutting equipment. Get ready to peel and stick your way to personalized flair!
Choosing The Right Paper And Adhesive
Choosing the right paper sets the foundation for your sticker quality. Different papers excel for varying uses. Waterproof, matte, glossy, or clear options exist.
- Matte – Best for a classic, non-shiny finish.
- Glossy – Ideal for vibrant colors and shine.
- Clear – Perfect for a transparent background.
- Waterproof – Necessary for outdoor use.
The right adhesive ensures longevity. Permanent adhesives are best for outdoor items. Removable adhesives suit indoor or temporary applications.
Essential Cutting Equipment
Precision matters in die-cut sticker production. Equip yourself with the right cutting tools.
| Equipment | Use |
|---|---|
| Die-Cutting Machine | For cutting complex shapes accurately. |
| Cutting Mat | Protects your surface and supports precise cuts. |
| Blades/X-Acto Knife | Essential for fine-tuning and detailed work. |
| Software | To design and lay out your sticker before cutting. |
Don’t forget blade replacements to maintain sharp cuts. Calibration tools for your machine ensure accuracy.
Design Basics For Die Cut Stickers
Embarking on the journey of die cut sticker design invites creativity and strategic planning. These stickers are not just fun but also essential marketing tools. They uphold your brand image to the public. Understand the design basics to ensure your die cut stickers make the desired impact.
Understanding Shapes And Edges
Die cut stickers boast unique shapes that follow the outline of your design. Precision in the shape of a sticker can make your brand stand out. Here are a few tips:
- Outline your design to visualize the final shape.
- Avoid intricate edges that complicate the die-cut process.
- Ensure ample border space around your design for a clean cut.
Color Schemes And Branding
Colors convey emotions and brand values. They play a crucial role in how your sticker is perceived. Find the right balance for your die cut stickers:
- Select colors that reflect your brand’s personality.
- Use a limited color palette for simplicity and coherence.
- Contrasting colors enhance readability and attraction.
Remember, cohesive color schemes ensure your stickers support your wider branding efforts. Consistency is key in making your stickers instantly recognizable.

Credit: www.uprinting.com
Creating Your Design Digitally
Designing a die-cut sticker is an adventure that blends creativity with technology. It’s like painting on a digital canvas, where your imagination can run wild. The first step is crafting your design digitally. This stage transforms ideas into visual delights. Before diving into the digital world, let’s explore tools and tips for bringing your sticker to life.
Graphic Design Software Options
Choosing the right software is key to a stunning sticker design. Here’s a list of user-friendly graphic design programs perfect for your project:
- Adobe Illustrator: Best for scalability without losing quality.
- CorelDRAW: Great for intricate vector-based artwork.
- Inkscape: A free alternative for vector design.
With these tools, creating eye-catching stickers is a breeze. Each has unique features suited for beginners and pros alike.
Preparing Artwork For Die-cutting
Preparing your artwork for die-cutting is the next crucial step. Follow these tips for a hassle-free printing process:
- Ensure your design has a bleed. A bleed extends your design slightly beyond the final sticker shape. This prevents unprinted edges in the final product.
- Create a cut line. This indicates where the sticker should be cut. Use a stroke or path to outline the exact shape.
- Check for high resolution. Your design should be at least 300 DPI for crisp printing.
Attention to detail in this phase ensures your stickers look professional and sharp.
From Digital To Physical: The Production Process
Turning your digital sticker designs into physical items is exciting. The production process has vital steps to ensure quality and precision. From selecting the right materials to the final cut, every step matters.
Printing Considerations
Choosing the right printer and inks is crucial. Durability and color vibrancy depend on this choice. You want your stickers to last and look good over time.
Material selection also plays a big part. Different surfaces affect ink adhesion and sticker longevity. Papers, vinyl, and laminates are popular choices. Pick one that suits your needs.
Consider print resolution. High-resolution printing ensures your design looks sharp when printed. Aim for at least 300 DPI for clear, detailed images.
Precision In The Die Cutting Stage
Die cutting gives stickers their unique shapes. A custom die mold is made to cut your design accurately. Precision is key here.
Each sticker must be cut perfectly to match your design. Even a slight shift can spoil the shape. Modern die cut machines use sensors to ensure alignment.
Test runs are important. A test sticker is often produced to check the cut. Once approved, full production starts.

Credit: www.carstickers.com
Finishing Touches And Quality Check
As your die cut sticker takes shape, the final steps ensure longevity and aesthetic appeal. A sticker isn’t just a design; it’s a statement that should stand the test of time and use. That’s where finishing touches and quality checks come into play. These steps can make all the difference. They transform your sticker from a simple printout to a durable, professional-looking piece. Ready to dive in? Let’s go through the essential finishing processes.
Coating And Lamination For Durability
First up, let’s talk protection. Coating and lamination offer a shield against the elements. This is essential for stickers that will brave the outdoors or frequent handling.
- UV Coating: Adds sun protection to prevent fading.
- Glossy Finish: Gives a shiny appearance and adds an extra layer of defense.
- Matte Lamination: Offers a sleek, non-reflective surface and protects from scratches.
These treatments not only enhance longevity but also improve the look and feel of your sticker. Choose the right finish based on where and how your sticker will be used.
Inspecting The Final Product
Once coated, your sticker deserves a thorough inspection. Details matter and catching any imperfections is crucial. Follow this checklist:
| Aspect | What to Inspect |
|---|---|
| Color Accuracy | Ensure colors match your original design. |
| Edge Integrity | Check for smooth, precise cuts with no fraying. |
| Surface Quality | Look for a uniform finish without bubbles or creases. |
| Lamination Alignment | Confirm lamination is correctly applied and aligned. |
A meticulous quality check ensures each sticker represents your brand perfectly. Once you give the green light, your stickers are ready to make an impact.
Tips For Effective Die Cut Sticker Design
When creating a die cut sticker, impact and individuality are key. A striking design turns a simple sticker into a powerful branding tool. Let’s explore how to make your stickers pop and common blunders to evade.
Making Your Stickers Stand Out
- Choose Vibrant Colors: Bright hues grab attention and enhance visibility.
- Opt for a Unique Shape: Shapes tailored to your design are memorable.
- Include a Clear Message: Keep your text readable and to the point.
- Focus on Quality: Use high-resolution images for a professional look.
- Consider the Finish: Matte or glossy options can change the sticker’s feel.
Enticing stickers tell your brand’s story and adhere to minds, not just surfaces.
Mistakes To Avoid In Sticker Design
- Overcomplicating the Design: Simple engages more than complex.
- Neglecting the Bleed Area: Avoid design cut-offs; extend past the edges.
- Choosing the Wrong Font: Legibility is crucial, pick the right typeface.
- Forgetting Brand Consistency: Align your sticker with your branding.
- Ignoring the Target Audience: Design with your demographic in mind.
Steer clear of these pitfalls to ensure your stickers leave a positive, lasting impression.
Leveraging Die Cut Stickers For Your Business
Die cut stickers provide a unique opportunity for businesses to express their brand in a fun and engaging way. These stickers are cut to the exact shape of a design, creating a tailored look that stands out. Companies can use die cut stickers as a powerful tool to enhance brand recognition, cultivate customer loyalty, and interact with their audience. Crafting the perfect sticker requires creativity and strategy. Let’s dive into how to make them work for your brand.
Promotional Strategies Using Die Cut Stickers
Effective promotion breathes life into business campaigns. Die cut stickers serve as versatile assets in such promotional efforts:
- Provide them at events to spread brand awareness.
- Include as a freebie with customer orders for a personal touch.
- Design limited edition series to create collectible excitement.
Stickers can transform ordinary packaging into engaging stories that customers love to share. Social media platforms become stages where these sticker encounters turn into free marketing opportunities.
Real-life Examples Of Successful Sticker Campaigns
Stickers as marketing tools can yield impressive results. Let’s explore some success stories:
| Brand | Campaign | Outcome |
|---|---|---|
| Apparel Brand X | Stickers in fitting rooms | Increase in online shares |
| Drink Company Y | Limited edition bottle stickers | Spike in collectible sales |
| Tech Startup Z | Laptop stickers for events | Boost in booth visits |
These examples demonstrate that stickers can serve beyond just decoration. They’re tools for engagement and can significantly impact a company’s reach.
Frequently Asked Questions On How To Design A Die Cut Sticker
How Do You Make A Die-cut Sticker?
To make a die-cut sticker, design your sticker and select a shape. Print your design on vinyl. Use a die-cut machine to cut the outline. Peel off the backing and apply your sticker.
Can You Make Your Own Die Cuts?
Yes, you can create your own die cuts using a die cutting machine, respective dies, and suitable materials like paper or cardstock. Custom dies can be designed and purchased for unique projects.
How Do You Make A Die-cut Sticker In Canva?
To create a die-cut sticker in Canva, start a new design, choose your desired dimensions, design your sticker using images and text, then download the design with a transparent background for printing.
How Do You Make A Die-cut Outline?
To make a die-cut outline, select your shape, create a vector design using software like Adobe Illustrator, and set a stroke to define the cut line. Ensure the line is recognizable by the die-cutting machine for precise cutting.
Conclusion
Designing die cut stickers is a blend of creativity and precision. Start with a bold concept, refine your artwork, and choose your materials wisely. Remember to review your design before printing to ensure your sticker makes a lasting impression. Unleash your artistic flair and craft stickers that truly stick out!